Showing posts with label Spring. Show all posts

Sunday, April 21, 2013

God's Beauty

Sundays are such wonderful days, especially in the Spring. Our weather has been very spring-like over the past several days which has given me the chance to photograph some of God's beauty growing right in my own yard. Just had to share. Enjoy!!


Thanks for visiting,


Monday, April 8, 2013

Springtime Mantel

Finally...warm weather was upon us this past weekend. In celebration I changed out the mantel from Easter to Spring. Most of the items you will see are from the thrift store so the design was definitely done on a shoestring budget. Enjoy!


 **********************************************************

Fireplace Mantel - Right Side
VASE:
The vase was an old glass vase I had saved that came from flowers that were delivered for some occasion (can't remember which one). I spray painted it with one coat of Primer in preparation of adding color but liked the way it looked white and kept it that way. -sorry, no tutorial for that project

 
CANDLE HOLDER: For the tutorial click HERE


BIRDS on Stands:
I purchased the birds at a close-out sale at the craft store early last fall (marked down 60% and more). The candle holders where from various other sources. The tallest glass one was purchased from Wal-Mart at Christmas time and was part of my Christmas mantel. The middle size one was bought at the thrift store and painted and the smallest is a votive (one of about a hundred), that I made for my wedding (its turned upside down). 


**********************************************************


Fireplace Mantel - Left Side


Bird Cages:
I found both bird cages at the thrift store over the winter. I just knew I could use them in some way this Spring/Summer. The smaller one was black and the larger one was already white but a bit beat up. I spray painted both white to enhance their beauty.

Other Stuff:
The Bow was made with left over material from the Spring Wreath I made last year. The Candles in the large cage are from around the house. They are sitting on top of more of the wedding votives. The Moss Balls were left behind by a tenant from my rental property. The Victorian Candle Holder was purchased from a thrift store as is, (so beautiful no changes were necessary).


Happy Spring & Thanks for Visiting,


Sunday, April 7, 2013

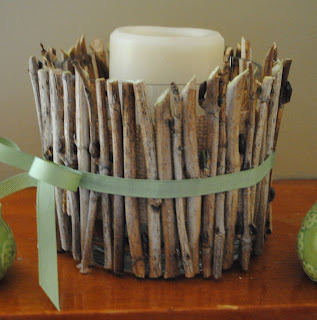
Changeable Wood Sticks Candle Holder

While redressing my fireplace mantel for spring I wanted to add a natural element. 


Now I can not take credit for this Wood Sticks Candle Holder, I just wanted to elaborate on the original design by making it a removable decor for a glass vase that I had on hand. This way if I want to use the same glass vase for something else I could just remove the covering. 

Here are the steps I followed. 
Enjoy!


1). Find twigs from your yard...
 

2). Measure the height of container you plan on using...

 5). Measure the circumference of the container...
 

4). Mark the twigs with that measurement from the height...

5). Cut twigs (I used wire cutters)...

6). Make sure to cut enough sticks to surround the container...

7). Cut a piece of burlap about 2" longer than the circumference. Place burlap strip on a piece of foil. To create a line to follow, fold the foil. Spray paint the burlap strip with glue and begin laying out the cut sticks leaving about 1" of burlap on each side.


8). Spray another light layer of glue over the sticks and lay a piece of pre-cut ribbon in the center of all of the sticks. For a bow, cut the ribbon about 12" longer than the circumference.

9). To keep my fingers from getting sticky I used one of the left over sticks to press down the ribbon to the sticks.

10).Make sure that the ribbon is glued on the sticks only.


11). After the everything is completely dried wrap it around the vase and tie at the end. 


I used my vase as a candle holder but you could use it for flowers, a plant, or anything you desire. 


 Thanks for visiting,

Friday, March 15, 2013

Porch Table

Happy Friday. I have been buried in paperwork today but slipped in time to post my latest project. I found this little table two summers ago and have used it during the warm seasons for my plants. I purchased a small jar of ASCP in Emperor's Silk and wanted to try it out on more than one project so I only painted the top and bottom shelf. The color was very bright so I waxed it with AS Dark Wax which worked beautifully. Its a little too cold for my plants to be moved outside yet so I staged the table for the photograph. Can't wait to move all my green girls out there...come on Spring!!

BEFORE                                                  AFTER

Thanks for visiting

Monday, March 11, 2013

Pistachio Cake

OK, I'm going to tell you something very personal about myself. I have a gigantic sweet tooth. I would rather eat cake than anything else (except for maybe french fries). I often make sweets for my Saturday night church group but tonight I decided to make a cake just for us. I just love this recipe and with a few little tweaks have made it my own. 

Enjoy! 


Recipe - Cake
White cake mix (I use Duncan Hines)
3 eggs
1/3 c. veg. oil
1 c. club soda
1 box pistachio pudding mix  

  • Preheat oven to 350 degrees F, (175 degrees C)
  • Grease and flour 2 ten-inch round pan
  • Mix first 4 ingredients until well mixed
  • Add pudding mix and mix well again (about 1 min).
  • Pour batter into prepared pans and bake 350 degrees until done. I use ALL of these methods to determine if my cakes are done.
    • Insert a toothpick into the center of the cake. When it comes out clean with a few crumbs adhering, the cake is done.
    • Look at the edges of the cake. When they start to pull away from the sides of the pan, the cake is done.
    • Touch the surface of the cake near the center—it should bounce back to the touch without leaving a finger imprint.
Recipe - Icing
1 box powdered sugar
1 c. Crisco (shortening)
1 tsp. almond flavoring
1/2 c. milk (or enough to obtain the correct consistency)    
1 box pistachio pudding mix
Chopped Walnuts

  • Mix powdered sugar and Crisco until well blended.  
  • Add milk a little at a time until a creamy icing consistency is reached then add almond. 
  • Add pudding and mix well adding more milk if necessary. 
  • Garnish with chopped walnuts.

Thanks for visiting