Saturday, January 12, 2013

Oil Rubbed Bronze Candle Holders


 Over the holidays I looked and looked for silver candle holders with no luck. Of course the week after Christmas I found these (only 2 of 3 shown in the picture)


Now its not that I don't like silver for every day but I like it much better during the holidays. So, the dilemma was..save them for next Christmas or figure out how to recreate them into something that will work all the time. 


I searched the internet and for an inspiration and found these really cool holders at Pottery Barn:

 
 Hmmmm....wasn't really sure how to recreate this but I did like the cast bronze look, so I used the Rust-oleum oil rubbed bronze spray paint I had left over from a past project and got to work.


After I was done spraying the oil rubbed bronze on all three holders I left the project to start the mercury-glass-vase  project (remember, I finally found the Looking Glass spray paint). 
When I came back to this project I wondered what would happen if I sprayed over the oil rubbed bronze with the left over looking glass spray. I figured that if I didn't like it I would just spray paint the bronze back over it. 
 
Now the interesting part...after I sprayed the glass spray over the bronze spray, this is what started to happen;


Of course I did then sprayed all of the bases:


 Then I sprayed the tops;
of all of them;


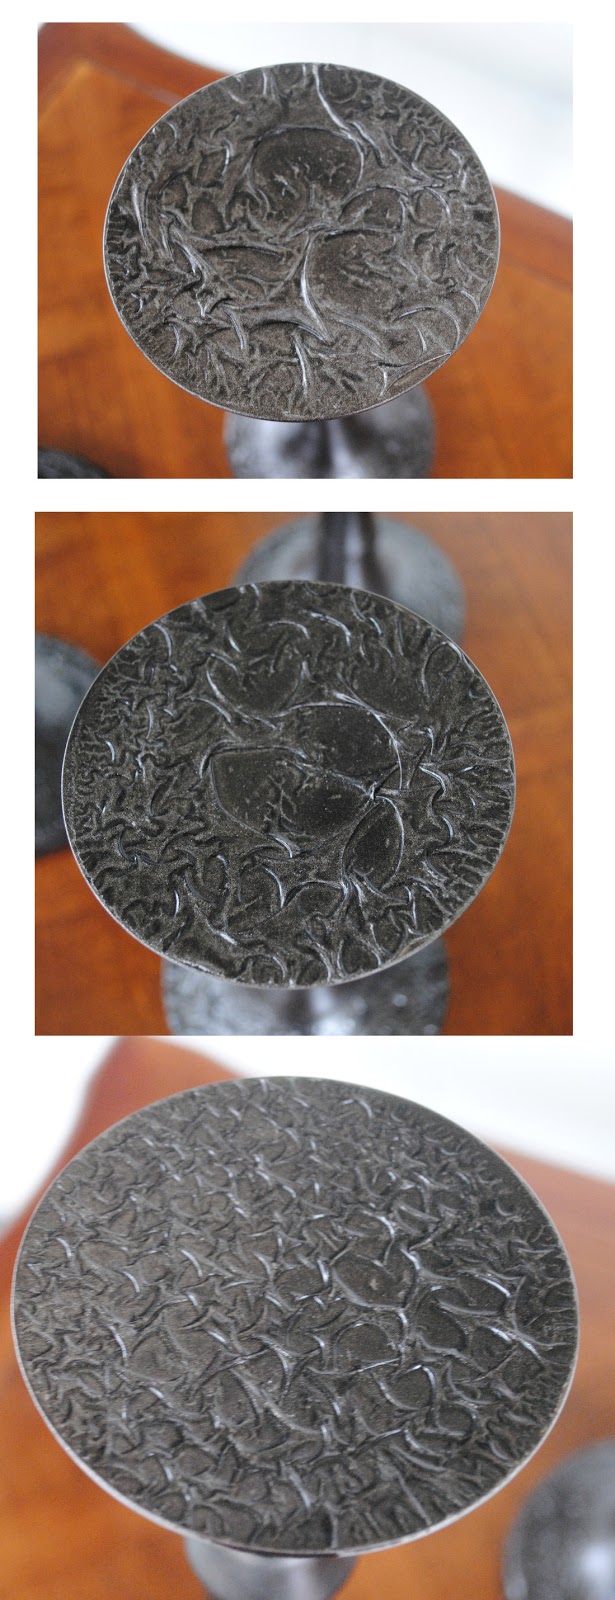
And each one came out different, naturally, and on their own. They started to take on a life of their own and I was hooked. No, they didn't look exactly like the inspiration pieces but there were similarities. Both sets have a bronze color and both have a design element. I like!!!

I finished off each candle holder with a polyurethane spray:

The finished piece in it's new home on our mantel;


Thursday, January 10, 2013

4x6 Change-up

I love photographs. I love to take them and display them. One day my niece made a comment that my house was "...starting to look like granma's with all the pictures everywhere". So, in an attempt to get off that track I have been searching for other ways to display my photos. I have come across several good ideas and have even built a board on pinterest entitled "Ideas for Wall Art". I want to find a way to display some of my favorite pics AND be able to change them up periodically. Here is my twist on one way to do this....

I found these frames at the local thrift store; 3 for $6
I took the frames apart and painted each one with the left over ASCP in Duck Egg.
Annie Sloan Chalk Paint in Duck Egg

After the paint dried I rubbed on a layer of Minwax Paste Finishing Wax. I then cut out 3 pieces of cork from cork tiles that where the same size as the previous glass (that I removed from the frame) and installed them.


 Then I found 3 - 4x6 photographs (that were hanging on the fridge), and placed double side tape on each and hung them onto the cork board. I had planned on using thumb tacts but didn't have any cute ones on hand and used double-sided tape instead. I think I like this way of attaching the photos to the cork better. I might change my mind later but for now the double-sided tape works. 


  So....whatcha think???
 

Tuesday, January 8, 2013

Mercury Glass Vase

Let's face it...weekends are great. They are especially great when, after weeks of searching, I find "Looking Glass" spray paint at the local hardware store. Yea!!!

Before starting on the $4 Glass vase I scored at the thrift store, (did I tell you there is a thrift store 2 blocks from my home?), I tried out the instruction posted by Anna at "Take The Side Street". 

  Looks great huh??

So, on with the large vase.... 
I followed Anna's instruction at this point so go HERE 

 One thing I did do that was a bit different was to spray the paint in the bottom of the vase and then role it around to cover all of the interior surface.

Here you can see the what it looks like through the drying process....turns from an ugly grey to a mirror. It drys really fast so time is of the essence.

 Next (per the instructions) I sprayed the 1/2 water, 1/2 vinegar solution right on the dried paint.

Note: I only used one layer of Looking Glass spray paint which is different then the five coats that Anna demonstrated. 


Per the instructions, I then very gently rubbed (and blotted) the inside with a paper towel to lift the paint off the glass.


Now here is where I did things a little different. 

After the initial paint removal, I spray painted the inside of the vase again and BEFORE it dried, I sprayed the water/vinegar solution. This caused the wet paint to bead up slightly AND to run a bit which caused a really unique effect. After the water/vinegar dried slightly I blotted again. I did this over and over again until the look I wanted was achieved. (scroll down to the bottom)...


Note: The color is a bit off in the last three photos as they were taken in the dining room with a different light. The first picture is closest to what it looks like....a mirror (if that makes sense)

Monday, January 7, 2013

Friends

Just had to share the gift my daughter gave me for Christmas. Don't judge my love of "Friends". This will make a great conversation piece. Thanks Mallory!!


Sunday, January 6, 2013

Step Stool for Lucy

Just wanted to post a picture of a footstool I bought at the local thift store. Again, no "Before" picture but here is the "After". 

I bought it for my beautiful granddaughter, (see below) so she can sit at the coffee table to eat, color, or work on a puzzle. It lives tucked under the coffee table just waiting for Lucy to visit. 

The original had a woven heavy weight fabric with a horse jockey theme. I replaced it with a softer fabric but honestly I might change it again because after Lucy used it last I realized its not the most kid-friendly fabric. But for now.....


My Beautiful Granddaughter

Garden Porch Table

After finishing the plant stand, (see here), I had some ASCP left over and decided to save one of my porch tables from donation to the local thift store. I bought this table years ago from Ikea as a side table in a rental apartment. It was never very appealing but did the job in the rental. Because I never really had a use for it in my new home it found a place on the front porch. 


So...with the leftover ASCP (Duck Egg) I went to work.


 To tone down the brightness I did a little sanding....


.... and then hand rubbed Minwax Wood Finish (Gunstock) stain (wiped on wiped off) and finished off with Minwax Finishing Wax


So...for an afterthought project, not bad. I must say I am not thrilled with the orangish streaks from the Gunstock colored stain but in the end I think the thrift store will not be getting this table after all....at least not this year. LOL