Showing posts with label Thrift Store Find. Show all posts

Sunday, July 14, 2013

Beachy Basket Door Decor


I'm back! I can't believe I haven’t posted since last week and no, I have not been on vacation. The truth is that when the weather is warm I tend to spend more time outside in the garden and less time inside on the computer (a good thing I think). 


If you’re familiar with East Coast summers you know that once the humidity hits, working outside is not enjoyable, so while it's still bearable, I’ve been outside rolling the mulch (LOL).  According to the local weather forecast it seems our hot-humid dog days of summer are here so I now have more time to get back to blogging. 

While we are not taking any official summer vacations this year we are doing some weekend getaways and next weekend we will be going to the beach. Keeping within this mindset I decided my front door needed something different, something beachy. 


I found a little basket at the thrifts store and turned it into a welcoming decoration with a beach theme. I hope you enjoy this tutorial and as always…Enjoy!


Supplies: Silk flower, Starfish, Floral Foam, Floral Wire, Ribbon, Glue Gun and the Basket...


I started by gluing the floral foam to the bottom of the basket.
 

 I then separated the leaves from the flowers and attached them to floral wire. This is so I have more control over their placement in the arrangement.


 Then I started the arrangement by starting with the yellow flowers, then the turquoise flowers, then the blue flowers. The filled in with the leaves as needed.


 To add the starfish to the arrangement I first hot glued them to flower wire...


...and then, the Bow:

 And here is the finished piece hanging on it new home!


 Thanks for visiting,

Tuesday, June 11, 2013

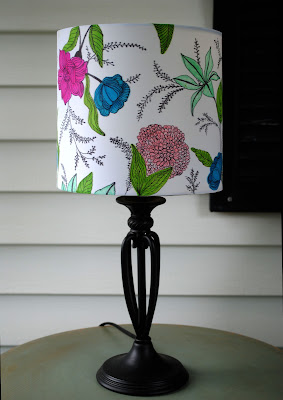
Sharpie Lamp Shade

Inspiration comes from everywhere. 


I have a sweater that I love because of its design and colors. I also have a plain white thrift store lamp shade ($3) and a box of colorful sharpies that beg to be used. 
Put it all together and what do you get....?


PLUS

EQUALS


Thanks for visiting,
UPDATE 6/18/13 - THIS PROJECT WAS FEATURED ON KAMMY'S KORNER and.....
Photobucket

 ....The Shady Porch, and.....
 

The OPC's The Better Half - The Humble Brag. 

Featured on The Humble Brag
Thanks to All!!!


Thursday, May 16, 2013

$25 Dining Room Table - Seats Six

I found this table back in early winter at the local thrift store. It was priced at $35. I walked away. Then I came back....three more times. I wasn't returning to the store for the table but each time I came back I walked to the furniture section to see if it was still there. There was something about the line of the legs that I really liked but the oval shape seemed dated. I caved and offered $25 ("come on...it's been here all week") and obviously I got it. It sat in my basement for months. My original intent was to finish and sell. Then one day out of the blue I decided to bring it upstairs into my dining room to see how it looked. I actually got sick of the old table that was there and put it out on the curb for special pick-up and needed a place to eat.


As I have said before, I have to live with a piece of furniture before I really know what I want to do with it. Sort of an artistic analysis. So I broke it down...

Cons: the wood did not match the chairs and it was oval (outdated?) and damaged.

Pros: It was wood, it fit the space, it came with a leaf, I still loved the line of the legs and it served the purpose (we had a place to eat)

I search various furniture blogs, pinterest, and popular high-end online stores. I was inspired....

I decided to paint the legs and base an off-white and the top a rich brown to match the chairs. 


I mixed a couple of chalk paints to make the creamy off-white color and gave it three coats. I topped it with a soft clear wax mixed with a dark wax to tone it down. (ASCP used)

I sanded the top and started with Varathane in Kona (1 coat) followed by about three coats of Dark Walnut.


I sealed the top with three coats of Polyacrylic. I wanted a very durable surface for everyday use and love polyacrylic for its durability. 


 And here is the finished product...with a leaf!


Thanks for Visiting,


UPDATE - MAY 22, 2013
FEATURED ON SAVING 4 SIX, THINK TANK THURSDAY 
saving4six

UPDATE - MAY 24, 2013
FEATURED ON OPC'S THE BETTER HALF, THE HUMBLE BRAG LINKY PARTY!!
Featured on The Humble Brag

UPDATE - JUNE 4, 2013
FEATURED ON ROMANCE ON A DIME's TAKE IT ON TUESDAY BLOG HOP #80!!! 
 RomanceOnADime.com


Friday, April 19, 2013

"Let's Vase It" Series - #4, DIY Rosette Vase

Well, here we are at the end of week and the end of my four part series "Let's Vase It". 
I am concluding this series with a DIY Rosette Vase.

This was a fairly easy DIY with a unique pattern. I made rosette swirls with my fingers but you can be creative and do whatever pattern you want. Also, any metallic paint would work. Regardless of what you decide just have fun!


                       It was made with...
  • a thrift store glass vase
  • silicone caulk 
  • primer spray paint
  • metallic spray paint
  • satin sealer spray paint


 Now all you have to do is add the flowers~!!


Thanks for visiting,