Showing posts with label Paint. Show all posts

Saturday, April 6, 2013

Revamped Bathroom: Project #3 - Shelving Wall Decor

Finally, Project #3. 

In my initial post, "Will you spruce up my bathroom Mom?", I did a mini makeover of my son's bathroom in his rental apartment. His requests were; 1). make it more masculine, 2). use black, 3). make no structural modifications, and 4). work within a shoestring budget. 

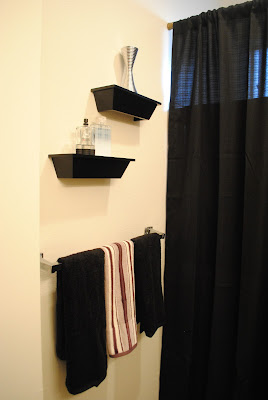
In the last two posts I showed you how I made some wall art using thrift store finds and how I upgraded a builder-grade mirror for $18.50. Today I am going to show you how I dressed up the other wall in his bathroom with shelves ($3 each from thrift store), stenciling ($2 craft paint, $5 stencil), and several items that were left over from the Bedroom redo and that were laying around the apartment. 

Here is the finished product.

I found the shelves and other accessories from the local thrift store. The mats were used in project #2 as part of the wall art. To the left are the shelves.

The shelves were very beat up so I revamped them with Valspar Latex Enamel in Satin Black. As mentioned in Mirror project (#1), I was away from home and in a 20-something apartment, and needed a paint that was soap & water washable, (I usually use oil based black paint when painting over wood).


After they dried, I hung them on the wall and arranged a few of my thrift store finds. Something just wasn't right. Hmmmmm???


I sat an stared at them for a while and then I got it. Stenciling was what it needed. Off to Michael's!

I found the perfect stencil and egg plant colored craft paint and headed home. Unfortunately I got so exited I forgot to take pictures of the stenciling process but here is the end result and my attempt at finding just the right arrangement of accessories.

 Not quit right, too sparse.

Getting closer...

By George, I think that's it! Love!!


So what was the $$ damage:
      • Shelves = $3 each x 2 = $6
      • Craft Paint = $2
      • Stencil = $4
      • Black paint & accessories = no charge (on hand) 
For a Grand Total of $12(+tax)

I hope you enjoyed all of the projects that went into my son's Bathroom Revamp including the Mirror Makeover. I truly enjoyed doing this for him and sharing it with you. If you have any questions please feel free to drop me a line.

Thanks for visiting,


Thursday, April 4, 2013

Revamped Bathroom: Project #1 - Mirror Makeover

In my last post "Will you spruce up my bathroom Mom?" I did a mini makeover of my son's bathroom in his rental apartment. The guidelines I needed to follow were to 1). make it more masculine, 2). use black, 3). make no structural modifications, and 4). work within a shoestring budget.

Here is the before/after:

The first project I tackled was the mirror. As in most rental apartment bathrooms there is a builder-grade mirror glued to the wall. My plan was to frame it but I had to figure out a way to do this so that it would be easily removed when my son moves. I also had that pesky budget restraint

I found these wood strips at Michael's. 

I painted the front, sides, and back of each one with Valspar, Satin Black, Latex Enamel*, (on hand from the bedroom makeover project)Remember, I am away from home and in a 20-something apartment, hence the "latex" choice. I am more a fan of oil based black paint but for this project soap & water washable paint was necessary.
 *When painting wood to be adhered to a mirror, always paint the back so that when it is attached the reflection of the back of the wood matches the front and will blend.

Here is a photo of the wood drying.
Again, because I had limited work space, I started by painting most of each piece. The tops in this picture are unpainted so I could lean them against the concrete wall safely. After they dried I turned them around and painted the rest. I finished with a coat of Valspar Clear Sealer in Satin (also at no cost since I used this for the bedroom makeover project  and sorry, no pic). 

Now...how the heck to attach the wood to the mirror so that they can be easily removed when it's time to move?

I found "Glue Dots" at Michael's ($4.50)...let's see if this works? For more information on this item click HERE.


I followed the instructions. They go on really easy.

The first piece after installation.

Luckily 3 of the wood pieces fit perfectly and I only had to cut one piece (the bottom). I used a small wood cutting saw.*


And here is the finished product. The Glue Dots worked great. I did put on a lot of them just in case. Will have to wait to see if they pass the test of time (and humidity of a bathroom). Cross your fingers.


The total for this project was: 
  • Wood = $3.50 ea x 4 = $14
  • Glue Dots = $4.50
  • Paint & Sealer = no charge (on hand) 
Drum roll please.......$18.50 + tax
 
*I purchased the small cutting saw while visiting with the intent of adding it to my tool collection at back home. I did not factor the one time price of this tool into the total cost.

Thanks for visiting,