Showing posts with label Repurpose. Show all posts

Monday, June 3, 2013

Literally Turned Upside Down

Back in the late 90's round ball candles were very popular and I had a wall sconce that was designed to hold one. I can't remember what ever happened to the sconce but for some reason I still have the glass candle holder. Instead of donating it to the local thrift store I decided to repurpose it by turning it upside down and making a glass cloche.


I couldn't find a picture of those sconces but this one is pretty close except without the round ball candles.
Here is my glass candle holder...


 I also had bought a glass plate from the thrift store and used this technique to give it a mercury glass look.


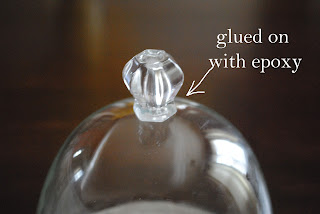
 I found a glass drawer knob at the hardware store to attach to the top of the candle holder.
(The photo I took of the knob was a little fuzzy so the one on the left came from the hardware store's website)


 I used epoxy to glue the knob to the top of the glass candle holder.


 It was really simple to put this together. The real challenge is in decided what to put inside. I tried several ideas using stuff I have around the house.
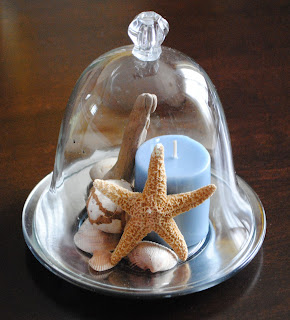
The first one you saw was the obvious and one my most favorite beach theme. 

 Staying with the spring/summer theme I made this...

 ....and this


And finally this...


And then I put together my favorite.


Here it is in its new spot in my home...

So glad I didn't give it away!

Thanks for visiting,
Friday, April 5, 2013

Revamped Bathroom: Project #2 - DIY Thrift Store Wall Art

Ok, so on with the next project from my previous post, "Will you spruce up my bathroom Mom?" If you will recall, I did a mini makeover of my son's bathroom in his rental apartment. His requests were; 1). make it more masculine, 2). use black, 3). make no structural modifications, and 4). work within a shoestring budget. 

In yesterday's post I showed you how I revamped his builder-grade mirror by adding a frame that could be easily removed. In this post I am going to share how I made wall art out of thrift store finds all for the grand total of $27 (+tax).

The finished product:


First, I have to confess that the frames where recycled. They were hung on the wall with photographs in the "before" bathroom:


Cute, but definitely not masculine. I decided to repurpose them and removed the glass, mats, and photographs, pulled out the hardware on the back and inside and spray painted them with Rust-Oleum spray paint in Satin/Claret Wine.


I found these black shiny mats at the thrift store ($5 each) and decided to glue the painted frames to them with epoxy ($5).


After doing this I felt like there should be something 3-dimensional in the middle and went back to the thrift store in search of the perfect item. I found these steak plates for $3 each;

Being made of metal but a bit scuffed up I wanted to polish up the silver. First I painted them both with Zinsser Cover Stain Primer.


And then painted them both with Martha Stewart Metallic Craft Paint in Titanium ($2).


 The next step was to glue them down in the center of the frame. Again, I used epoxy.


 To give even more of an interested I hung them positioned in different directions. I used heavy duty, double sided foam tape. 


 Black Mats = $5 each x 2 = $10
Frames = no charge (repurposed)
Spray paint  = $4
Primer = no charge (on hand)
Craft Paint = $2 
Metal Steak Plates = $3 each x 2 = $6
Epoxy = $5   
Foam Tape = no charge (on hand from Bedroom Redo Project)

Total cost of this project (give or take) $27 + tax


Thanks for visiting,
  

Wednesday, March 27, 2013

Repurpose Series #2 (Spaghetti Jar to Beachy Vase)

I know we are only a few days into Spring but I just can't help but think about Summer. When I think of Summer my minds goes immediately to the Beach...


I have always dreamed of owning and decorating a beach house and am drawn to beachy decor but for now I will just have to decorate my own little cape with bits of it. Here is an inexpensive project to bring that feeling into my home (and yours). Enjoy!


Here are the supplies you need...

ROPE

SPAY GLUE (or any glue that will hold rope)


 GLASS JAR (cleaned of course)

PRIMER AND SPRAY PAINT (Almond/Satin)

Directions:
  1. After cleaning and drying the glass jar, spray with the adhesive and wrap rope from bottom up. 
  2. Cut the ends at an angle so it will blend into the top and bottom of the resting rope.  

  3. Spray on primer. It's okay to miss a spot or too, doesn't need to be completely covered in primer.
  4. Very lightly spray the Almond Satin spray paint. Again, try NOT to cover the entire surface. Just a mist all over should do it.
  5. The rope might loosen where the end is connected so if this happens pull out the old glue gun and zap the areas that are loose.  

  6. Glue on a star fish or shell or whatever makes you think of the beach.


Thank you for visiting!

UPDATE: 4/3/2013
This project was featured on Roadkill Rescue
Thanks Beckie!!
 
   
UPDATE: 4/9/2013
This project was featured on Take it on Tuesday
Thanks Betsy!! 

RomanceOnADime.com  
 
********************************************************************
posted on...
DIY Club
 
Do-It-Yourself-Decorating-ItsOverflowing


 Media
link_party_friday