Pages

Saturday, September 28, 2013

Mercury Glass Jewelry Holder


Saturday…a day of rest. Huh?? 

Oh yea, that’s Sunday. Well for me this particular Saturday is a day in sunny So. California visiting my boys.  I almost feel guilty even being here and leaving behind a house with several unfinished projects but it only lasts a minute (giggle) and then I walk out of the Target and see this view and know it's all gonna be OK (smile).

OK, back to the reason for this post...

Remember the closet?   

We are still at work on the walk-in closet. Here is the latest pic of my husband diligently painting the shoe shelves. You can also see a the chandelier...one of my favorite things in the room.

 
 Since this photo we have finished all of the painting and I have laid down the floor. I even found this vintage dressing table and have started putting my mark on it (stay tuned). I know, its a really bad photograph but I forgot to take another one before staring the restoration. This was taken in the store with my phone but I think you can see a lot of the lovely detail.


So you see, things are coming together nicely. 
While waiting for the paint to dry I have also been working on
 little projects that will have a purpose in the room. 

Here is a little glass container I made to catch my earrings.

I found 2 of these little glasses a while back at a thrift store for $1 each. 
I used one to make a tiered serving dish


 I used the same faux mercury glass technique as in this project except I worked on the outside of the container instead of the inside. 


To get the effect desired and allow the drips to flow evenly, I stuffed the inside of the glass tight with paper towels, tight enough to all me to suspend the glass in air. 


Again, to get the mercury glass look, follow the instructions here

Next I glued a ribbon of acrylic crystal gems to the rim....

 ...and VoilĂ , I now have a really cute little container to throw my earrings into when I am in a hurry and don't have time to put them in their correct spot (stay tuned).


Thanks for visiting,

Sunday, September 22, 2013

First Days of Fall Decor

The first day of Fall 2013 is here. The season officially begins at 4:44pm EDT here in my eastern town. It is officially called the autumnal equinox denoted as a day when the sun crosses directly over the Earth’s equator and both the hours of day light and night are almost equal.  To celebrate the beginning of my favorite season I will share some of my fall decorating ideas. I find I always want to decorate for Fall but don’t want to start with a Halloween theme. This year I have picked Owls and Apples as the theme and I think they work well.  Enjoy!!


I found the Owls at RiteAide and they were all 50% off. The pumpkins were from the dollar store. 


I made this vase at the same time I the Mother's Day Keepsake Vase and you can find instructions on how to make it here. Of course you will use the craft store leaves instead of photographs. 


This display was created with wooden apples I found at the local thrift store and a cloche I made in the beginning of June.

Here is a mantel display I created using the same wooden apples, red metal bird cage and a mantel clock...all found at the local thrift store.

Thanks for visiting,


Tuesday, September 17, 2013

Jeweled Hair Pins

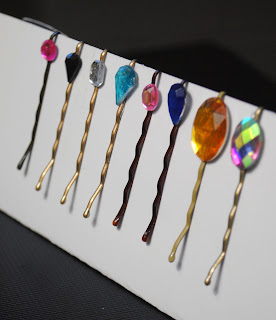
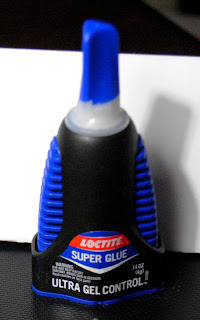
I am in the process of growing my bangs out. Well, at least most of them. While getting through this tortuous process I have been using hair pins to pull back the pieces that just are not trained to stay back on their own. I have found a lack of variety of hair pins and decided to make some. With the left over plastic gems and gel super glue from my Jeweled Glass Jewelry Tray I gathered up some bobby pins and glue them down...simple and cute!!


Thanks for visiting,


Monday, September 16, 2013

Change is in the Air

For those who don't know, my husband and I have lived in our 1951 Cape Cottage for a little over 3 years. This is the photograph that was part of the MLS listing.


When we were looking for a home to start our life together I wanted the new townhouse and my husband wanted an older home closer to or small city. He wanted a vintage home in walking distance to shops and particularly to the commuter bus that offers optional transportation into the "big" city where he works. 


He won and I now live in an amazing home that I love more than he does. The one way he got me to agree to give up the new townhouse (with the large finished basement family room with fireplace) was to promise we could modify to reach my standards. Three years later my standards and my original idea of modification has changed. I still want to make some changes but only if the charm of the home remains. So, here we are, three years later and we are starting the first of many projects. 

Project #1 - Walk in Closet (Just for Me)
just a sneak peak for now 

Here was my inspiration photo I found on Houzz...


My before:

My friend and contractor Mike (right) and one of his helpers:

The beginning of the evolution:

I only want to reveal a little bit of what's going on. Notice the light (still covered in the packing plastic). Its a chandelier with pink jewels and it has set the tone of this room. After buying this I actually started calling the closet my Boudoir. Once I purchased the chandelier my creative juices started flowing (ok, pouring) and I now have about a gazillion projects in process.


Here is the first of many. 

Jeweled Glass Jewelry Tray


I created this by using a glass plate from the thrift store (50-cents), plastic gems from the craft store ($4) and gel super glue ($4).


First I arranged the gems on the plate the way I wanted them and then I glued them down
...simple as that!


Thanks for visiting,


Sunday, September 15, 2013

Mummy Stromboli


Want a really cool and easy meal that will get your family into the Halloween spirit? I found this recipe a year or so ago and make it at least once a month. Of course it’s just a normal every day Stromboli and not a Mummy Stromboli all the other months. I usually follow the recipe but sometimes I change it up by using ground beef instead of sausage. I also like to add fresh tomatoes when they are in season and skip the meet all together. Not the pepperoni of course, but the sausage or ground beef.  Regardless of the changes it's always a big hit. Give it a try!

Ingredients:

  • Pork sausage or ground beef or both
  • ¼ cup chopped onion
  • ½ cup tomatoes, cut into small slices
  • ½ cup sliced pepperoni
  • 1 can refrigerated pizza crust
  • 1 cup shredded mozzarella cheese
  • 1 cup pizza sauce
  • 1 egg white

 Set oven to 425°F

1). In a skillet, cook sausage/ground beef and onion over medium heat until sausage/ground beef is no longer pink; drain. 
2). Reserve 2 slices of pepperoni; chop remaining pepperoni.
3). Unroll pizza dough onto a cookie sheet covered in parchment paper. Using a roller and a small about of flour, roll out the dough to form a rectangle that is about 15”x 9”.

4). Sprinkle the cheese down the center of the dough rectangle. Leave about 2-3 inches of the dough uncovered on each of the long sides and a little less on the shorter sides.
 

5). Top with the sausage/ground beef, pizza sauce, sliced pepperoni and fresh tomatoes. Then add some more sauce.

6). Using kitchen scissors make cuts in the long side of the dough that are about 2” apart. Cross each strip over the top of the filling and pinch the edges so that they seal.


7). Place 2 pepperoni slices at the top to look like the mummy’s eyes. 

8). Brush the egg white over the dough.


Bake 15 minutes or until golden brown. Let stand 5 minutes before slicing. Cut into slices to serve. 


 Thanks for visiting,